Showing posts with label Blogger Basics. Show all posts

Tuesday, March 3, 2009

Adding Adsense To Blogger

This post will cover how to add Google Adsense to your blog. Why Adsense? It lets visitors who don't find what they were looking for on your blog find what they are looking for and you get awarded monetarily as a result! Not a bad setup.

To get it set up go to Layout --> Monetize

I recommend leaving the 1st option for side panels and under posts to show Adsense. Click Next.

If you have an existing account already select the option like in the picture. Insert your e-mail address you use for your Adsense account, your zip code and last 5 digits of your phone number you have on file. Click Next. Your done. View your blog.

If you don't have an Adsense account keep the 1st option click Next fill out the information needed -- pretty straight forward, but if you need help you can get Adsense help with signing up here.

Alternatively you can click Add Gadget within Layout and select the Adsense Gadget. Here you will have more control on what type of Adsense layout you want.

Click the plus sign this will come up:

The easiest method here is just to try different types of Adsense sizes and colors and see what you like and what looks good on you blog.

You can also edit the post and select ads to be shown between posts and after how many posts as well (1 post, 2 posts, etc).

I find the blend template typically works best for all situations. I think vertical wide banners look good on the side panels or standard or large rectangles. I think towards the top of the blog 5 link horizontal rows looks good, and banners look good under posts.

On this blog thus far I've used the 5 link horizontal row on top and banners between posts for Adsense.

Hint: To get the 5 link horizontal row up top I 1st selected Adsense Gadget for the side panel and then moved it above the posts. I then went back in and changed it to 5 link horizontal row and blend template.


Add Blogger Subscrption Links

Subscription links are a relatively new gadget added by google to blogger. To get there go to layout and add a gadget. On this blog I've added it to the bottom of the layout/page.

Once the various gadgets are pulled up, scroll until you find this one and click to open like shown in the picture.


Once you click the plus sign this screen will show and you can whatever text you want to display to get visitors to subscribe.


Click Save and check you blog. That's it!

Here's what it looks like on this blog:


Monday, March 2, 2009

Add Blog To Blog Directories

Blog directories are an excellent place to submit your blog to. Most of the time they are free, and on this post we will just mention the free ones, and they will not only give you a lot of extra free traffic and exposure, but will also give you a inbound link, which is good for search engines when they decide how much value your blog is worth. This in turn will make the likelihood of your submitted content to be indexed by a search engine, which in turn will give you even more traffic! So, in short blog directories are great for more traffic and SEO purposes.

I will show you how to sign up for 1 blog directory. All the others are similar. They may even ask that you sign up for an account. Signing up for account with them is no different than on my previous posts where you sign up for an account with anyone else. The benefit of those that have you sign up for an account is that once you have an account with them you can log in and see at once all the blogs that you have submitted, submit more blogs, and make adjustments.

Before you do anything, I recommend you create a notepad entry with all the information that any blog directory will ask for. Name it the name of your blog plus info. So I named mine "mybloggerexperienceinfo". I added the following information to mine:

blog, blogger, blogging, blogger help, blogger tips, blogger resources, blogger tutorial, blogger tutorials, blogger instructions, blogger by example, blogger step by step
http://mybloggerexperience.blogspot.com/feeds/posts/default http://mybloggerexperience.blogspot.com My Blogger Experience

My blogger experience will show you a step-by-step visual evolution on how to go from a beginner at signup with a Minima template to more advanced blogger by adding various beginner to advanced blogger features and tricks.

mybloggerexperience@yahoo.com

Notice I have the keywords related to the blog site, then I have my rss feed URL -- Your's is the same just replace my .com address with yours and keep the /feeds/posts/default portion. Next I have the blog URL by itself, and then the name of the blog and blog description- notice I just used the description I have on my blog(copy and paste), and e-mail address. Save it. I recommend doing this for all your blogs.


OK, now I will show you a quick blog directory you can submit to. 1st go to Blogsubmit. Appropriate enough name for a blog submission directory don't you think? The link I gave you takes your right to the blog submission page. The top portion where you start adding information looks like this:
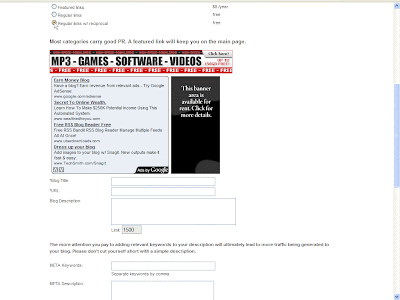
1st off like shown in the picture click the "Regular link with reciprocal". The reason why this is better than just the regular link is because it's natural for your site to have outgoing links anyway, especially as far as the search engines are concerned, and it will increase the likelihood that your blog will be added and much quicker if it was going to be in the 1st place.

Ok now as far as entries the blog title, URL, Description will now just be copy and paste. Copy your keywords into the "Meta Keywords" field and you most likely can just copy the same description again into the "Meta Description". Mine was a little long so I just took off the 1st part before the "step-by-step" and it worked. Scroll down some more and you will see:
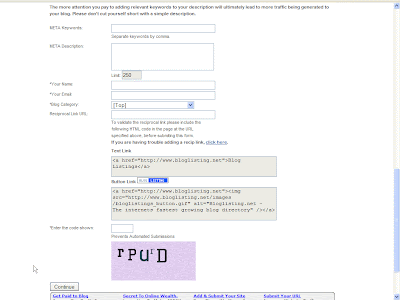
On "Your name" you can just enter a nickname like you used on blogger, enter your e-mail-- again copy and paste off your text file. Scroll to find the appropriate blog category, copy your URL again for the reciprocal link URL. Enter the word verification at the bottom. Now before you click continue, copy the the 2nd text box of information and open up the layout. Add a widget and select HTML/Javascript and paste the information you copied into the content section like the following picture shows:
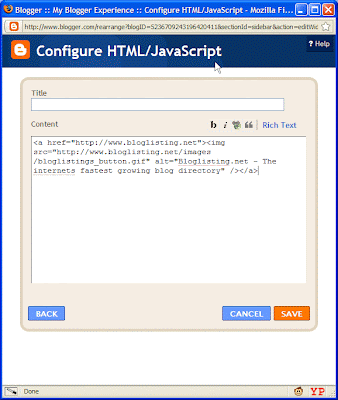
Now alternatively if you have done what was shown in the post for signing up for technorati already, you can just add this below the technorati embed code. This is what I have done on this blog. Any future directories can just be copied and pasted in the same manner.

Ok now back to bloglistings.com you can hit continue. They will send you an email. The e-mail states that if you reply that your chances of getting indexed faster increase. That combined with choosing the reciprocal link option makes you ahead of the game. To take things a step further I've added this in my reply to the e-mail which you might want to do as well:

Brad,

As requested I am replying to this e-mail to increase the chances of my blog being listed faster. I have also already added a reciprocal link to the blog site found on the main page right side panel. Looks like a great blog directory you have there, and I hope to be added to the site soon! Thanks,


http://mybloggerexperience.blogspot.com/

That's all you need to do for this directory.

Here are some other directories that I like that you can sign up to.


http://www.bloghub.com/

http://www.bloggapedia.com/

http://www.blogarama.com/

http://www.blogrankings.com/

http://www.blogcatalog.com/ -- This is my favorite and google seems to love it.

I will add more in the future to the blog. Just check the side panel and click and you can sign up from there.

Here's what this blog currently looks like with the newest additions:
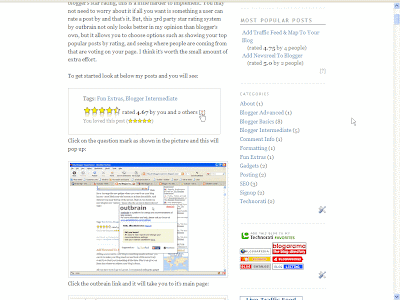


As you can see quite the difference already.


Add Star Rating The Blogger Way

In this post I will show you how to create a star rating for visitors to rate your blog post's. This is not the way I have currently on my blog, but this is the easiest way and might be good enough for you needs. With this method you use blogger's own star rating. To get to it, you need to get to blogger in draft-- draft.blogger.com -- or simply replace the "www" portion of the URL, if your currently logged into blogger, and replace it with "draft".


Click Enter or whatever you do to go from site to site after your type the URL ordinarily.

While in draft go to layout and click to edit the post section:


This will pull up this screen:

Click where I clicked in the picture to choose "Show Star Ratings".

Believe it or not, that's it. You now have your own star ratings that will show below posts. Next time I show you star ratings, I will show you a more advanced 3rd part method that in my opinion looks nicer and gives you stats on where someone is clicking from, and other cool extras. But, if you're not worried about the extras, this will be good enough.


Sunday, March 1, 2009

Understanding Blogger Comment Options

In this post we will discuss all the different comment options that blogger provides. To get to the comment options click up top on the Setting tab as shown in this pic.

Once you click that tab you will come to this screen:

Click the comment section as shown in the picture and you will get to this screen:

Starting from the top if you want to hide your comments click hide otherwise leave this alone.

Below this it has who you willow to comment. By default it should be registered users. But, you can change this to anyone, those with google accounts, or only members of your own blog. I would recommend if you want the most comments to choose "anyone" here.

With the next option, if it isn't already selected, I would choose "embed below post". This will make it more apparent for visitors that they can comment. *Note that with this option you will only see the comments below post if your post is opened on it's own page, but not on the main page. The other 2 options will either pop up a window where users can comment or just load a new screen. I'd recommend under the post.

Next, we have new post have comments. This is what you want. Leave it alone. Otherwise there will be no comments.

On the next option I'd just leave it alone to unless you want to show links back to whoever posted on your blog. For SEO purposes this is not too good, because you will have alot of outgoing links or once you get the reputation alot of spammers trying to get inbound links for their sites.

Scroll down a little bit more and you will see:

I'd just leave it with "New Posts have backlinks" on the 1st option.

Next you can decide how you want your date on your blog post to appear. I'd keep that the same too.

Next, if you have a message you want to post on your comment form you can put 1 in the box, but I'd just leave that alone too.

On comment moderation, I'd change it to "Always", just to prevent spammers, and if you want to receive e-mail notification when someone leaves a comment so that you can moderate you can place the desired e-mail address in that field. You might want to place a e-mail here that way you can check the comments asap.

Scroll down a little more and you will see this screen:

By default it will show word verification when someone tries to post-- to prevent bots, etc. But, I hate those things. So will your readers. If you got comment moderation turned to Always then you can see who's posting what before it goes live anyway. So, I'd just get rid of that. There also seems to be an issue on some blogs where word verification doesn't seem to work and nobody can even comment at all! So I'd change that to "no".

Next, I'd leave the profile images on -- they're always nice when someone posts.


Finally, on comment notification e-mail I'd leave this blank. Especially if you already put an e-mail for comment moderation since you would already know someone commented if you need to moderate a comment.

That's it. Click save. That's all there is with comments on blogger.


Technorati Tags: ,

Saturday, February 28, 2009

Add Newsreel To Blogger

Adding a newsreel to your blog is something simple and easy you can do to make your blog stand out and look a little more lively even if you don't post something all the time. Plus it can give you ideas into whatever subject your blog is about.

All you have to do is go to Layout. I recommend adding the gadget on the bottom of the blog so underneath the posts. Click add gadget like in this picture:

gadget at bottom of blogger layout

Once you click that widget choice screen will pop up. Scroll down until you see the following:

choose newsreel and click the blue square like in the picture. This will bring up this screen:

blogger newsreel configure
Change the title to something that has to do with your blog and name a keyword or more than one separated by commas that you want the newsreel to refresh news about. Click the box if you want news when clicked to open in a new window. This is what mine looked like when I was done:

change blogger newsreeland finally click save and on your blogger layout it should now look like this towards the bottom:

added gadget newsreel bottom of blogger layout

That's it open your blog and you will see the new scrolling information the newsreel provides near the bottom. Here's what mine looks like:

newsreel on blog itself


Friday, February 27, 2009

Add A Blog Descrption

In this post I will show you how to add a blog description. Blog descriptions are important because they not only can tell a visitor quickly what your blog is about, but the description also helps search engines organize data about your site to show when it gets indexed.

There is more than 1 way to add a description but the easiest and most familiar, if you've been following the posts so far, would be to once again click the layout tab. You will see a header section with the name of your blog.

Click the blue Edit link on the right side like shown in the picture and the following screen will show:

Below the blog title, which is the name you gave your blog when you created it, you will see a section called blog description. This is where you will add a informative overview of what your blog is about. Keep it short and to the point and make sure you use relevant words to describe your blog and not just fluff like "The coolest site on Earth" unless of course your site truly is the coolest site on Earth, then more power to you. You just might not get a fair shake in Search Engine indexing if you don't have the right words to describe it, or an appropriate blog title for that matter.

Now there are other options on here, but for now we won't worry about them. After you have written your blog description click the orange Save button. Your description will show right after the blog title on your blog. This is what My Blogger Experience looks like now after adding the description:


Technorati Tags: ,

How To Add Labels

In this post I will discuss how to add labels to your blog and go over how to do basic rearranging of your Gadget buttons.

Earlier when we discussed posting I mentioned what labels are for and their importance. Now it's time to include them on the blog.

1st, go to Layout and click on "Add A Gadget".

A screen like this pops up:

Scroll down until you see one for Labels that looks like this:

Click on the blue box with white plus sign like shown in the pic and the following screen will show for configuration:


By default the title says Labels. You may choose to keep that or have nothing, but I prefer to use the term Categories.

I also prefer it to sort in alphabetical order, but if you want the most frequent categories to be shown on top you might choose to select that radio button instead.

Click the orange Save button and now on the layout screen you should see the new Gadget. Now I prefer to have the Search above my categories so to move it below the Search box put your mouse cursor over your new Gadget(Labels/Categories whatever you named it). It should look like this:

Now click your left mouse button and drag downward.


Now stop when it's right below the Search Gadget.

This is how you will move gadgets in the future. You can move them up and down wherever you want by dragging and dropping with your mouse.

Ok Click the orange Save button on top portion of the layout screen, and your done! This is what my blog looks like now with the new categories/labels gadget added:


Technorati Tags: ,

How To Get To Blogger In Draft

This is something that isn't necessarily for beginners but is very easy to use and will make things easier if I just present it now.

Ok you're familiar with blogger.com. Well there is also something called blogger in draft --- draft.blogger.com . This is where a lot of new Gadgets and capabilities are introduced that are not functional yet on the standard blogger.com. When you change things here it will take effect on your blog like the standard blogger.com, but it just offers a lot more options.

So to use it you just go to draft.blogger.com and login like you usually would. The blogger in draft main page looks like this:


Or, if you are already logged into the standard blogger, just delete the "www" part of the address no matter whats after the ".com" -- could be /post-edit-g kljlksdj whatever just leave that part alone. Just delete the "www" part and insert "draft" and you will remain on your current screen that your logged into but you will now be in the draft version.


How To Start A Blogger.com Blog

Ok thought I would backtrack real quick just to make sure I didn't lost anyone. The last post was all about just how to make a post. Pretty beginner stuff. But, it would do you know good to know if you haven't opened an account on Blogger in the 1st place. So this is a real quick rundown of how to start a blogger.com blog.

Ok 1st of all you will need to type in the following address in to your address bar: www.blogger.com.

Or you can go there by clicking here.

You should see a screen like the following:

Click on the orange button that says "CREATE A BLOG". It will take you to this screen:

Starting at the top field and heading down, all you have to do is provide a valid email address and retype it again, enter a password and type it again, choose a name you want to appear on your blog (might not want your real name might want an alias or nickname or something random like Tarzan67), enter the correct letters in the word verification box, and finally click the box for I accept the Terms of Service. Click the orange arrow that says "CONTINUE".

If all goes well you will see the following page:

Ok here you enter a blog title. This is what your blog is going to be called. If it's going to be about dogs maybe "All About Dogs" or "Dog Mania" might be ideal for you. Whatever you want your blog to be named. Enter a name in the 1st box.

In the 2nd box you are choosing a website address. This is the address that will be typed into the browser or searched for in search engines if someone is looking for your blog or type of blog in the form of MYBLOGNAME.blogspot.com. Most likely you will want it to be as close as possible to the Title of your blog. So in the previous example if you chose "Dog Mania" as the Title then you might try entering DogMania in this box and click "Check Availability". If all goes well it will say, "This blog address is available. in green color. But if it says, "Sorry, this blog address is not available", then you can try their suggestions or you can try variations in your original choice such as "Dog-Mania", "DogMania2009", "DogManiac", etc and see if they work. Whatever works proceed to click on the orange "CONTINUE" arrow at the bottom. You will then see this screen:

By default the "Minima" template is selected. This is the template were using in this blog. So to learn the same things that the blog, just leave it selected and click on the orange "CONTINUE" arrow at the bottom. The next screen will look like this:

Click the orange "START BLOGGING" arrow. This will take you directly to your 1st post, which is where we were at on the previous post.


Technorati Tags: ,

Thursday, February 26, 2009

How To Post

Starting with the basics a very important thing to know is how to post on blogger. 1st of all here's how the blog looks so far:


As you can see pretty basic. The only post I've done so far is just what this blog is going to be about. Now how do you go about adding a post? OK on top you see the following options.


Your going to want to click on "Posting" on the left hand side. This will take you to this screen:


OK. so far so good. Now one of the most important parts of the post is the "Title". It's up top and looks like this:

This is where you add the title of your post. It's important because not only will it give the reader an idea of what's going to follow it, but it also counts as the name of the web page which can be found by search engine spiders. In this post I will name it "How To Post". Appropriate enough.


The screen below this is the window where all the actual content will be added and modified:

Right now as you can see the compose tab is selected as opposed to the "Edit Html". For right now we'll just worry about "Compose" because it's alot easier to start posting immediately. All you have to do to start typing. Is just click your cursor into the big open window there where it shows text in the picture above and start typing. Very easy. If you want space press enter a few times.


And there you go more space. If you want to modify anything it can all be done with the section immediately above the posting area which looks like this.


On the very left you see a drop down menu that say Font. This is where you can change fonts. Most of the time it's not anything you need to worry about but if you want to make things look the way you want them as far as text this is the place to go. Here's Verdona text font.

Here's Webdings text font. Here's the normal default text. Yeah!

Immediately going to the right we have a big T symbol. This is for text size. It's on normal now but goes from smallest to largest.

Next we have the b symbol-- you click this if you want to bold text.

To the right of that we have the i symbol. This is if you want to italicize text. You can even bold and italicize at the same time by clicking both.

To the right of the b and i symbols we have another T symbol but this time on top of color palette. You can probably guess what this if for. Changing colors. Default is black, which is what you will use most often.


Immediately to the right of the T symbol with colors there is a funny looking green button. This is used to make hyperlinks to link to other pages/sites. To use it create the text you want to use as anchor text. That's just means the text people will see that allows you to click on. So let's do it to link the the About page for example.

Select the text:


Then click the funny green button:


To get the URL of the about page which was my 1st post, I just clicked on the Title of the previous post and copied the URL.

Then I just pasted the URL into the box.

OK. So far so good. To the right of the linking option we have 4 buttons in a row that look kind of similar. This if just to indicate how you want to layout the text.

This is 1st button of the 4 which is align left.

This is the 2nd button of the 4 which centers.

This is the 3rd button of the 4 which is right align.


Actually if you start messing with too many of the options at one time the WYSIWYG(What you see is what you get) editor starts acting funny. I'm mentioning this because I can't show you the 4th button now,which is justify full. lol

To the right we have a symbol for numbers.. This allows you to make a numbered list.

  1. Just click on it
  2. and every time
  3. you hit enter
  4. it creates the
  5. next item in the list
  6. easy
  7. just click it again when
you are done

To the right of this is a similar option but this one just does bullets.

  • 1st item
  • 2nd
  • 3rd
etc

Got text you want to make look different and blocked in from the rest. Just select the text you want to change and click the quotation mark button to the right of the bullet list option. and text will look like this paragraph. Click again to turn off.


OK to the right of the blockquote button is a symbol with ABC and a check mark. This is spellcheck. You click this and it will highlight which words the editor feels may have been misspelled in yellow. By clicking the yellow highlighted words it will give you options to what spelling you may have intended.

OK to the right of spellcheck is a Picture symbol. This is for adding pictures like you see on this post. When you click it this window comes up


and most of the time you will just click the browse button and choose a picture off your hard drive that you want to display. For now just choose "none" for the layout option if it isn't already selected and click upload image and click done.

The last 2 options I never use so don't worry about them.

To the very right you see preview. By clicking this you can test what your page would look like if you actually clicked the Publish Post option.

OK so we're almost done. Below the post you see a section that says "Labels for this post: e.g. scooters, vacation fall" This is where you insert a comma separated label for the post your created. It's convenient because not only does it allow you to keep organized, but you can insert later a widget that will show all your labels and the number of post that have those labels. This is good for people looking at your blog who want to find information on a certain topic. For this post I have decided to use the labels "Formatting" and "Posting".

That's it click Publish Post, or Save Now if you want to come back and work on your post later.

**Note I have also added Technorati tags. I will talk about this another time.


Technorati Tags: , ,